OOP Practica - Geometry - Complete (full course on one page)
Generated on: 2026-03-25
1.1 Summary
- Objects have an identity (name), properties (attributes), and behavior (methods).
- Objects are placed in their own classes in the namespace
Geometry.Models. - Objects are instantiated using constructors.
- Static attributes and methods exist independently of the instance.
- Pillars of OOP are: encapsulation, polymorphism, abstraction, inheritance.
1.2 Creating a class
- Start Visual Studio and create a new project.
- Choose a folder where you will place all your Visual Studio projects. Name the project
Geometry. - Make sure the Solution Explorer is visible on the left side.
- Create a
Modelsfolder under the project. From now on, we will place all classes that define objects together in this folder. - Make sure the
Modelsfolder is selected. - Create a new C# class and name it
Circle. -
You will now see the following:
1
2
3
4
5
6
namespace Geometry.Models
{
    public class Circle
    {
    }
}
You can see both the namespace name and the class name here.
We first specify the attributes. A circle has a center point with an x-coordinate and a y-coordinate, and a circle has a radius. A circle also gets a color.
-
Make sure you have the following on your screen:
 1
 2
 3
 4
 5
 6
 7
 8
 9
10
namespace Geometry.Models
{
    public class Circle
    {
        public double Radius;
        public double CenterX;
        public double CenterY;
        public string Color;
    }
}
This means that every object of the
Circleclass has three attributes of typedoubleand one attribute of typestring.If the radius of a circle is known, then the circle itself can calculate the perimeter and the area. Below is how that works.
-
Add the two methods according to the code below:
 1
 2
 3
 4
 5
 6
 7
 8
 9
10
11
12
13
14
15
16
17
18
19
20
namespace Geometry.Models
{
    public class Circle
    {
        public double Radius;
        public double CenterX;
        public double CenterY;
        public string Color;

        public double CalculatePerimeter()
        {
            return 2 * Math.PI * Radius;
        }

        public double CalculateArea()
        {
            return Math.PI * Radius * Radius;
        }
    }
}
The perimeter of a circle is 2π * radius and the area of a circle is π(radius)². Both methods return the result as a value of type
double.We use UML class diagrams for an overview of the class. The class diagram of the
Circleclass looks like this:

The top cell contains the name of the namespace (Models) and the name of the class (Circle), separated by two colons.
The second cell contains the attributes (Radius, CenterX, CenterY, and Color). The plus sign means that the attribute is public (visible everywhere and therefore available). Next, you see the name of the attribute and its type.
The third cell contains the methods (CalculatePerimeter and CalculateArea). The plus sign again means that the method is public. Next, you see the name of the method and after the colon the return type.
1.3 Using a class
- Make sure the Solution Explorer is visible on the left side.
- Go to
Program.cs. - Create the
Mainmethod. -
You will now see the following:
1
2
3
4
5
6
7
8
9
namespace Geometry
{
    internal class Program
    {
        static void Main(string[] args)
        {
        }
    }
}
You can now use the
Circleclass in your program. -
Type
Circle myFirstCircle = new Circle(); -
Your screen will look like this:
 1
 2
 3
 4
 5
 6
 7
 8
 9
10
11
12
13
using Geometry.Models; using System; namespace Geometry { internal class Program { static void Main(string[] args) { Circle myFirstCircle = new Circle(); } } }- The
Circleclass is automatically imported because this class is needed to execute the code. Circle myFirstCircletells the compiler that you are declaring an object of theCircleclass with the namemyFirstCircle.myFirstCircleis the reference variable.- This object does not exist yet. The object is instantiated by the
newkeyword. - Once the entire line is executed, you have a new object of the
Circleclass that you can access via the variablemyFirstCircle.
- The
-
Type the following under the line you just entered:
myFirstCirclefollowed by a period.You will then see the following:
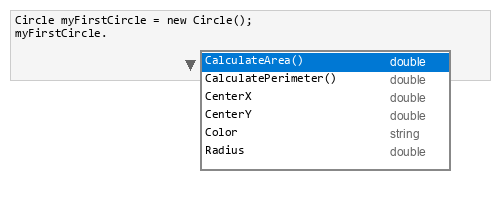
All attributes and methods in the
Circleclass are now available. You can modify and read the attributes and call the methods. -
Make sure your
Mainmethod looks like this:1 2 3 4 5 6 7 8 9 10 11
static void Main(string[] args) { Circle myFirstCircle = new Circle(); myFirstCircle.Radius = 3; myFirstCircle.CenterX = 3; myFirstCircle.CenterY = -2; myFirstCircle.Color = "green"; Console.WriteLine(myFirstCircle.CalculatePerimeter()); Console.WriteLine(myFirstCircle.CalculateArea()); } -
Run your program. Your output will look like this:
1 2
18.84955592153876 28.274333882308138 -
Try some other values and view the output.
1.4 Constructors
In this exercise, you add three constructors with the following signatures (this is called overloading):
- An all-args constructor: Circle(double radius, double centerX, double centerY, string color)
- A default constructor: Circle()
- A constructor with only the radius: Circle(double radius)
Use the following default values: radius = 1, centerX = 0, centerY = 0, and color = "white".
TIP: You can easily add constructors by choosing
CTRL+.and selectingGenerate Constructor.... Select the attributes you want to use in the constructor and Visual Studio will do the rest.
-
Add the following code to your
Circleclass:1 2 3 4 5 6 7 8 9 10 11 12 13 14 15 16 17 18 19 20 21 22 23
public Circle(double radius, double centerX, double centerY, string color) { this.Radius = radius; this.CenterX = centerX; this.CenterY = centerY; this.Color = color; } public Circle(double radius) { this.Radius = radius; this.CenterX = 0; this.CenterY = 0; this.Color = "white"; } public Circle() { this.Radius = 1; this.CenterX = 0; this.CenterY = 0; this.Color = "white"; }- A constructor has no return value.
- The constructor always has exactly the same name as the class.
- There can be multiple constructors, as long as they have different signatures (overloading).
- In the all-args constructor, the names radius, centerX, centerY, and color appear twice. Once as an attribute of the
Circleclass and once as a parameter of the constructor. To avoid confusion, C# has thethiskeyword. This refers to the class itself.this.Radiustherefore refers to the attribute of the class. The codethis.Radius = radiusassigns the value passed as a parameter to the attribute.
-
Modify the code in the
Mainmethod as follows:1 2 3 4 5 6 7 8 9 10 11
Circle myAllArgsCircle = new Circle(3, 1, 4, "green"); Console.WriteLine(myAllArgsCircle.CalculatePerimeter()); Console.WriteLine(myAllArgsCircle.CalculateArea()); Circle myDefaultCircle = new Circle(); Console.WriteLine(myDefaultCircle.CalculatePerimeter()); Console.WriteLine(myDefaultCircle.CalculateArea()); Circle myRadiusCircle = new Circle(6); Console.WriteLine(myRadiusCircle.CalculatePerimeter()); Console.WriteLine(myRadiusCircle.CalculateArea()); -
Run your program. Your output will look like this:
1 2 3 4 5 6
18.84955592153876 28.274333882308138 6.283185307179586 3.141592653589793 37.69911184307752 113.09733552923255 -
Try some other values and view the output.
1.5 Static versus non-static
-
Add the following code to the
Circleclass:1 2 3 4
public static string Definition() { return "A circle is a collection of points that all have the same distance to a center point."; }Note the
statickeyword. -
Add the following code as the first line to the
Mainmethod:1Console.WriteLine(Circle.Definition());so that your code looks like this:
1 2 3 4 5 6 7 8 9 10 11 12
Console.WriteLine(Circle.Definition()); Circle myAllArgsCircle = new Circle(3, 1, 4, "green"); Console.WriteLine(myAllArgsCircle.CalculatePerimeter()); Console.WriteLine(myAllArgsCircle.CalculateArea()); Circle myDefaultCircle = new Circle(); Console.WriteLine(myDefaultCircle.CalculatePerimeter()); Console.WriteLine(myDefaultCircle.CalculateArea()); Circle myRadiusCircle = new Circle(6); Console.WriteLine(myRadiusCircle.CalculatePerimeter()); Console.WriteLine(myRadiusCircle.CalculateArea());The
Definition()method is available without creating an instance of theCircleclass! The method is called via the class, so asCircle.Definition(). The method is, however, not available for instances, that is,myAllArgsCircle.Definition()cannot be used. -
Run this program.
1.6 Class diagram
The class diagram of the Circle class now looks like this:


+ means public
Underlined means static
You can now also see that for a method, the signature is shown, i.e., the name and the type of the parameter(s).
2.1 Summary
- Encapsulation is hiding the class's own attributes and/or methods that the class does not want to be accessed directly.
- The visibility modifier
privateensures that these attributes and methods are no longer directly accessible. - Instead, getters and setters can be defined for attributes.
- Constructor chaining is calling a more specific constructor from a more generic constructor.
- Objects can also be placed in an array and accessed via the index.
2.2 Encapsulation
- If needed, start from the project up to chapter 1. This contains the classes
ProgramandCircleas you left them at the end of chapter 1. -
Change the code in the
Circleclass as follows:1 2 3 4
private double _radius; private double _centerX; private double _centerY; private string _color;privatemeans that the attribute or method is only available within the class itself. It is therefore no longer accessible fromProgram. -
Add getters and setters (properties) in the
Circleclass.TIP: You can easily add properties by right-clicking the fields, selecting Quick Actions and Refactorings, then Encapsulate fields. Or use
CTRL+.and choose Generate property. -
Modify the
Mainmethod as follows:1 2 3 4 5 6 7 8 9 10
static void Main(string[] args) { Circle myDefaultCircle = new Circle(); Console.WriteLine(myDefaultCircle.Radius); Console.WriteLine(myDefaultCircle.CalculatePerimeter()); Console.WriteLine(myDefaultCircle.CalculateArea()); myDefaultCircle.Radius = 3; Console.WriteLine(myDefaultCircle.CalculatePerimeter()); Console.WriteLine(myDefaultCircle.CalculateArea()); } -
Run your program. Your output will look like this:
1 2 3 4 5
1.0 6.283185307179586 3.141592653589793 18.84955592153876 28.274333882308138 -
Try some other values and view the output.
2.3 Constants
-
Add the following line to the
Circleclass (above the other attributes):1private const double LimitValueForBigShape = 100.0;Your attributes should look like this:
1 2 3 4 5
private const double LimitValueForBigShape = 100.0; private double _radius; private double _centerX; private double _centerY; private string _color;constmeans the variable can no longer be changed and is therefore a constant. In C#,constis implicitly static (equivalent to Java'sstatic final), so the constant is shared by all instances of the class. Per C# coding conventions, constants use PascalCase (not SCREAMING_CAPS as in Java). -
Add the following method to the
Circleclass:1 2 3 4 5 6 7
public string DescribeSize() { if (CalculateArea() > LimitValueForBigShape) return "I am big!!!"; else return "I am small!!!"; } -
Modify the
Mainmethod as follows:1 2 3 4 5 6 7 8 9 10 11 12 13
static void Main(string[] args) { Circle myDefaultCircle = new Circle(); Console.WriteLine(myDefaultCircle.Radius); Console.WriteLine(myDefaultCircle.CalculateArea()); Console.WriteLine(myDefaultCircle.DescribeSize()); myDefaultCircle.Radius = 3; Console.WriteLine(myDefaultCircle.CalculateArea()); Console.WriteLine(myDefaultCircle.DescribeSize()); myDefaultCircle.Radius = 6; Console.WriteLine(myDefaultCircle.CalculateArea()); Console.WriteLine(myDefaultCircle.DescribeSize()); } -
Run your program. Your output will look like this:
1 2 3 4 5 6 7
1.0 3.141592653589793 I am small!!! 28.274333882308138 I am small!!! 113.09733552923255 I am big!!! -
Try some other values and view the output.
2.4 Constructor chaining
-
Change the code of the constructor with signature
Circle(double radius)as follows:1 2 3
public Circle(double radius) : this(radius, 0, 0, "white") { }Note that
this(radius, 0, 0, "white")calls the all-args constructor within the class. The default values for centerX, centerY, and color are passed. -
Change the code of the default constructor
Circle()as follows:1 2 3
public Circle() : this(1) { }this(1)now refers to the constructor with signatureCircle(double radius)within the class. The default value for radius is passed.- The most generic constructor (the default constructor) calls the more specific constructor, which in turn calls the most specific constructor (the all-args constructor).
- Note that every default value is determined in only one place.
-
Modify the code in the
Mainmethod as follows:1 2 3 4 5 6 7 8 9 10 11
Circle myAllArgsCircle = new Circle(3, 1, 4, "green"); Console.WriteLine(myAllArgsCircle.CalculatePerimeter()); Console.WriteLine(myAllArgsCircle.CalculateArea()); Circle myDefaultCircle = new Circle(); Console.WriteLine(myDefaultCircle.CalculatePerimeter()); Console.WriteLine(myDefaultCircle.CalculateArea()); Circle myRadiusCircle = new Circle(6); Console.WriteLine(myRadiusCircle.CalculatePerimeter()); Console.WriteLine(myRadiusCircle.CalculateArea()); -
Run your program. Your output will look like this:
1 2 3 4 5 6
18.84955592153876 28.274333882308138 6.283185307179586 3.141592653589793 37.69911184307752 113.09733552923255Note that the output is the same as in Exercise 1.3.
-
Try some other values and view the output.
2.5 Arrays of objects
-
Change the code of the
Mainmethod as follows:1 2 3 4 5 6 7 8 9 10
Circle[] myCircleArray = new Circle[3]; myCircleArray[0] = new Circle(3, 1, 4, "green"); myCircleArray[1] = new Circle(); myCircleArray[2] = new Circle(6); for (int i = 0; i < myCircleArray.Length; i++) { Console.WriteLine(myCircleArray[i].CalculatePerimeter()); Console.WriteLine(myCircleArray[i].CalculateArea()); }The syntax for declaring and instantiating an array is the same. The three objects of the
Circleclass are placed in an array. A for-loop is used to access the three circles. -
Run your program. Your output will look like this:
1 2 3 4 5 6
18.84955592153876 28.274333882308138 6.283185307179586 3.141592653589793 37.69911184307752 113.09733552923255Note that the output is the same as in Exercises 1.3 and 2.4.
-
Try some other values and view the output.
2.6 Class diagram
The class diagram of the Circle class now looks like this:


+ means public
- means private
<<constant>> means constant field (PascalCase per C# conventions)
Underlined means static
Note: This diagram includes getters and setters (properties). From chapter 3 onward, we will omit them in class diagrams for brevity.
3.1 Summary
- Classes can be used as attributes in another class.
- The relationship between two classes can be classified in various ways.
3.2 Classes as attribute
- If needed, start from the project up to chapter 2. This contains the classes
ProgramandCircleas you left them at the end of chapter 2. - Create a new C# class named
Pointin theModelsfolder. -
Implement the class according to the following class diagram:
- Use default value 0 for X and Y;
- Use constructor chaining;
- Add the getters and setters (properties);


The
Circleclass is rebuilt below with an attribute of thePointclass instead of theCenterXandCenterYattributes. -
Remove:
- the attributes
CenterXandCenterY; - the all-args constructor and the constructor with only the radius;
- the getters and setters of
CenterXandCenterY.
- the attributes
-
Add a
Centerattribute of typePointto theCircleclass:1 2 3 4
private const double LimitValueForBigShape = 100.0; private double _radius; private Point _center; private string _color;The
Circleclass now has an attribute namedCenterof typePoint. -
Add the getter and setter for the
Centerattribute:1 2 3 4 5
public Point Center { get => _center; set => _center = value; }- Note that the return type of
Centeris an object of thePointclass. - The setter parameter is also an object of the
Pointclass.
- Note that the return type of
-
Add the all-args constructor:
1 2 3 4 5 6
public Circle(double radius, Point center, string color) { _radius = radius; _center = center; _color = color; }Note the constructor signature. There are three parameters that correspond to the attributes of the
Circleclass. -
Add the following
Circle(double radius)constructor using constructor chaining:1 2 3
public Circle(double radius) : this(radius, new Point(), "white") { }- As in 2.4 Constructor chaining, this constructor refers to the all-args constructor.
- The all-args constructor expects a parameter of type
Point. This is obtained by creating a new instance and passing it as a parameter. - The default value for
Circle.Centeris determined by the default constructor of thePointclass. - The default constructor for
Circledoes not need to be changed. It still calls the more specific constructor with the default value 1 for radius.
-
Verify that you have the three constructors.
The code in the
Mainmethod must also be adjusted. -
Modify the code in the
Mainmethod as follows (you only need to adjust the all-args constructor call):1 2 3 4 5 6 7 8 9 10
Circle[] myCircleArray = new Circle[3]; myCircleArray[0] = new Circle(3, new Point(1, 4), "green"); myCircleArray[1] = new Circle(); myCircleArray[2] = new Circle(6); for (int i = 0; i < myCircleArray.Length; i++) { Console.WriteLine(myCircleArray[i].CalculatePerimeter()); Console.WriteLine(myCircleArray[i].CalculateArea()); }- The line
myCircleArray[0] = new Circle(3, new Point(1, 4), "green")first creates an object of typePointwith coordinates (1, 4). - This object is then passed as the second parameter to the all-args constructor.
- The line
-
Run your program. Your output will look like this:
1 2 3 4 5 6
18.84955592153876 28.274333882308138 6.283185307179586 3.141592653589793 37.69911184307752 113.09733552923255 -
Try some other values and view the output.
-
Add the following two lines to your for-loop:
1 2
Console.WriteLine(myCircleArray[i].Center.X); Console.WriteLine(myCircleArray[i].Center.Y);myCircleArray[i]refers to an object of theCircleclass.myCircleArray[i].Centeris the property in theCircleclass that returns an object of thePointclass.myCircleArray[i].Center.Xis the property in thePointclass that returns the value of the X attribute.
-
Run your program. Your output will look like this:
1 2 3 4 5 6 7 8 9 10 11 12
18.84955592153876 28.274333882308138 1.0 4.0 6.283185307179586 3.141592653589793 0.0 0.0 37.69911184307752 113.09733552923255 0.0 0.0 -
Try some other values and view the output.
3.3 Class diagram
The class diagram of the Circle and Point classes and their relationship now looks like this:


+ means public
- means private
<<constant>> means constant field (PascalCase per C# conventions)
Underlined means static
Each Circle references one Center (Point); a Point may be shared by several circles (see 3.4 The relationship between Circle and Point).
3.4 The relationship between Circle and Point
The following class diagram shows the relationship between the Circle class and the Point class.


- A Circle contains one Point;
- A Point can belong to one or more Circles;
- The Circle knows about the Point;
- The Point knows nothing about the Circle to which it belongs;
- This relationship is called unidirectional and is represented by an open arrow on the child side.
3.5 The Rectangle class
-
Create a new class according to the class diagram below. Use the following extra information:
- The default value for length is 2;
- The default value for width is 1;
- The default value for topLeftCorner is determined by the
Pointclass itself; - The default value for color = "white";
- Use constructor chaining;
- A rectangle is a quadrilateral with four right angles;
- The perimeter is twice the length plus twice the width (or twice the sum of length and width);
- The area is length times width;
- The
DescribeSize()method is identical to that of theCircleclass; - Do not forget to add the getters and setters (properties);
-
Test your class by running the following code in the
Mainmethod:1 2 3 4 5 6 7 8 9 10 11 12 13 14 15
Console.WriteLine(Rectangle.Definition()); Rectangle[] myRectangleArray = new Rectangle[3]; myRectangleArray[0] = new Rectangle(4, 3, new Point(2, 5), "blue"); myRectangleArray[1] = new Rectangle(); myRectangleArray[2] = new Rectangle(25, 10); for (int i = 0; i < myRectangleArray.Length; i++) { Console.WriteLine(myRectangleArray[i].CalculatePerimeter()); Console.WriteLine(myRectangleArray[i].CalculateArea()); Console.WriteLine(myRectangleArray[i].TopLeftCorner.X); Console.WriteLine(myRectangleArray[i].TopLeftCorner.Y); Console.WriteLine(myRectangleArray[i].DescribeSize()); } -
Your output will look like this:
1 2 3 4 5 6 7 8 9 10 11 12 13 14 15 16
A rectangle is a quadrilateral with four right angles. 14.0 12.0 2.0 5.0 I am small!!! 6.0 2.0 0.0 0.0 I am small!!! 70.0 250.0 0.0 0.0 I am big!!! -
Try some other values and view the output.
3.6 Class diagram
The complete class diagram now looks like this:


+ means public
- means private
<<constant>> means constant field (PascalCase per C# conventions)
Underlined means static
Multiplicity * … 1 on an association: many Circle or Rectangle instances may reference the same Point; each instance still has exactly one Center / TopLeftCorner.
3.7 Code for the Point class
1 2 3 4 5 6 7 8 9 10 11 12 13 14 15 16 17 18 19 20 21 22 23 24 25 26 27 28 29 30 | |
3.8 Code for the Rectangle class
1 2 3 4 5 6 7 8 9 10 11 12 13 14 15 16 17 18 19 20 21 22 23 24 25 26 27 28 29 30 31 32 33 34 35 36 37 38 39 40 41 42 43 44 45 46 47 48 49 50 51 52 53 54 55 56 57 58 59 60 61 62 63 64 65 66 67 68 69 70 71 72 73 74 75 | |
4.1 Summary
- Inheritance from a base class to a derived class uses the
:keyword in C#. - The attributes of the base class get the visibility modifier
protected(only visible to derived classes). - Derived classes access attributes and methods of the base class via the
basekeyword. - Derived classes can override methods of the base class.
- The
ToString()method is used to describe the relevant information of an object in the class.
4.2 Inheritance: the Shape class
- If needed, start from the project up to chapter 3. This contains the classes as you left them at the end of chapter 3.
-
Create a new class
Shapeaccording to the following class diagram:

+means public
-means private (not used here)
#means protected (available to the class and all derived classes)
<<constant>>means constant field (PascalCase per C# conventions)
Underlined means static
In UML, virtual operations are often shown in italic; in C#,CalculateArea()andCalculatePerimeter()are declaredvirtualso derived classes can override them.Use the following extra information:
- The default value for color is "white" and since the default value is used in more than one place, make it a constant;
- Use constructor chaining;
- A shape is a collection of points;
- The perimeter is unknown, so return 0;
- The area is unknown, so return 0;
- TheDescribeSize()method is identical to that of theCircleandRectangleclasses;
- Add the getter and setter for color; -
Note: The
Definition()method is static. It therefore cannot be overridden in the derived classes. You can redefine a static method within the derived classes.- The three attributes are protected and therefore available to the derived classes;
- The methods
CalculatePerimeter()andCalculateArea()are public. However, they will be overridden in the derived classes; - The methods
Shape(string color),Shape()andDefinition()are public, because they say something specific about the Shape class; - The method
DescribeSize()is public. This method will disappear from the derived classes.
4.3 Inheritance: the Circle derived class
-
Change the class definition of
Circleas follows:1 2
public class Circle : Shape {The code
: Shapesays that theCircleclass is now a derived class of theShapeclass. All attributes and methods that are public or protected within theShapeclass are now also available to theCircleclass. -
Remove the line:
The constant is now inherited from the1private const double LimitValueForBigShape = 100.0;Shapeclass. -
Remove the line:
The attribute is also inherited from the1private string _color;Shapeclass. -
Modify the all-args constructor as follows:
1 2 3 4 5
public Circle(double radius, Point center, string color) : base(color) { _radius = radius; _center = center; }coloris an attribute of theShapeclass.baserefers to the base (super) class.base(color)calls the all-args constructor of theShapeclass. -
Modify the radius constructor as follows:
1 2 3
public Circle(double radius) : this(radius, new Point(), DefaultColor) { }The
Shapeclass determines the default value for color. This is used in the constructor chaining. -
Add the
overridekeyword to theCalculatePerimeter()andCalculateArea()methods:1 2 3 4 5 6 7 8 9
public override double CalculatePerimeter() { return 2 * Math.PI * _radius; } public override double CalculateArea() { return Math.PI * _radius * _radius; }overrideindicates that the original methods in theShapeclass are not used in the derivedCircleclass. Instead, the class's own methods are used. Note that the keyword is optional for correctness but improves readability. -
Remove the entire
DescribeSize()method from theCircleclass. The method in theShapeclass is now used and it is not necessary to have a separate implementation. -
Remove the entire
Colorgetter and setter. These are also inherited from theShapeclass. -
In the
Mainmethod, go to the line withConsole.WriteLine(myCircleArray[i].Center.Y);and add an empty line. -
Type
Console.WriteLine(myCircleArray[i]and then a period. You will see that the methodDescribeSize()is available in theCircleclass. AlsoColorgetter and setter are available. -
Select the method
DescribeSize(). -
Comment out the entire code about the rectangle.
4.4 Inheritance: the Rectangle derived class
-
Modify the
Rectangleclass so that it also becomes a derived class ofShape:- Add
: Shape; - Remove the attributes
LimitValueForBigShapeand_color; - Modify the all-args constructor: call
base(color)and removethis._color = color; - Adjust the constructor that passes the default value for color;
- Override the methods
CalculatePerimeter()andCalculateArea(); - Remove the
DescribeSize()method; - Remove the getter and setter for color.
- Add
-
Uncomment the code about the rectangle and run your program. Your output is the same as in 3.5 The Rectangle class.
4.5 Class diagram
Inheritance is shown with <|-- (same role as a white triangle in UML: derived class). The complete class diagram looks like this:


+ means public
- means private
# means protected
<<constant>> means constant field (PascalCase per C# conventions)
Underlined means static
Open arrow means unidirectional (association to Point)
CalculateArea() and CalculatePerimeter() on Shape are virtual; in Circle and Rectangle they are overridden.
DescribeSize() exists only on Shape and is used by derived instances.
Multiplicity * … 1 on an association: many Circle or Rectangle instances may reference the same Point; each instance still has exactly one Center / TopLeftCorner.
4.6 The ToString method
-
Add a
ToString()method to theShapeclass:1 2 3 4 5
public override string ToString() { return "Color: " + _color + "\nPerimeter: " + CalculatePerimeter() + "\nArea: " + CalculateArea(); } -
Add a
ToString()method to thePointclass:1 2 3 4
public override string ToString() { return $"({X:F2}, {Y:F2})"; } -
Add a
ToString()method to theCircleclass:1 2 3 4 5
public override string ToString() { return base.ToString() + "\nRadius: " + _radius + "\nCenter: " + _center.ToString(); }base.ToString()calls theToString()method in the base classShape. This returns a string as determined in step 1. TheCircleclass's own attributes are then added. Finally, theToString()method of the Center point is called. -
Add a
ToString()method to theRectangleclass:1 2 3 4 5
public override string ToString() { return base.ToString() + "\nLength: " + _length + "\nWidth: " + _width + "\nCorner: " + _topLeftCorner.ToString(); } -
Replace the two for-loops in your
Mainmethod as follows:1 2 3 4 5 6 7 8 9 10 11
for (int i = 0; i < myCircleArray.Length; i++) { Console.WriteLine(myCircleArray[i]); Console.WriteLine(myCircleArray[i].DescribeSize()); } for (int i = 0; i < myRectangleArray.Length; i++) { Console.WriteLine(myRectangleArray[i]); Console.WriteLine(myRectangleArray[i].DescribeSize()); } -
Run your program.
4.7 Code for the Shape class
1 2 3 4 5 6 7 8 9 10 11 12 13 14 15 16 17 18 19 20 21 22 23 24 25 26 27 28 29 30 31 32 33 34 35 36 37 38 39 40 41 42 43 44 45 46 47 48 | |
5.1 Summary
- Objects of a base class can be instances of any of the derived classes. This is polymorphism.
- Abstract classes and methods are intended to be declared and specified elsewhere (e.g., in a derived class).
- Nullable value types (e.g.,
int?,double?) wrap primitive types so they can behave like objects and hold null. - Converting from
inttoint?is called boxing; converting fromint?tointis called unboxing.
5.2 Polymorphism
- If needed, start from the project up to chapter 4. This contains the classes as you left them at the end of chapter 4.
-
Create a new method in your
Programclass below yourMainmethod:1 2 3 4
public static void ShowInformation(Shape shape) { Console.WriteLine(shape); }The parameter of this method is of type
Shape. -
Change your
Mainmethod as follows:1 2 3 4 5 6 7 8 9
static void Main(string[] args) { Circle myCircle = new Circle(3, new Point(2, 5), "green"); ShowInformation(myCircle); Console.WriteLine(); Rectangle myRectangle = new Rectangle(3, 4, new Point(-2, 6), "blue"); ShowInformation(myRectangle); }The
ShowInformation()method is called with variables of typeCircleandRectangle. A method that expects a parameter of a base class can always be called with a variable of a derived class. This is called polymorphism. -
Run your program. Your output will look like this:
1 2 3 4 5 6 7 8 9 10 11 12
Color: green Perimeter: 18.84955592153876 Area: 28.274333882308138 Radius: 3.0 Center: (2.00, 5.00) Color: blue Perimeter: 14.0 Area: 12.0 Length: 3.0 Width: 4.0 Corner: (-2.00, 6.00)The first half of the output concerns the
ToString()method of theCircleclass. The second half concerns theToString()method of theRectangleclass. The compiler determines whichToString()method to use. This is called dynamic binding.This principle can also be applied to arrays of a base class. Such an array can then hold objects of derived classes.
-
Add the following lines to your
Mainmethod:1 2 3 4 5 6 7 8 9 10
Shape[] shapes = new Shape[3]; shapes[0] = myCircle; shapes[1] = myRectangle; shapes[2] = new Circle(10, new Point(-1, -3), "crimson"); for (int i = 0; i < 3; i++) { Console.WriteLine(shapes[i]); Console.WriteLine(); } -
Run your program. The array contains objects of type
Shapeand can be filled with objects of any of the derived classes. The correctToString()method is called for each.
5.3 Abstract classes
-
Change the declaration of your
Shapeclass as follows:1public abstract class Shape -
Change the methods
CalculatePerimeter()andCalculateArea()as follows:1 2
public abstract double CalculatePerimeter(); public abstract double CalculateArea();- Note that both methods have no body. They are only declared here.
- The implementation of the methods happens in the derived classes.
You can only define new derived classes from an abstract class if you override the abstract methods in those derived classes.
-
Run your program. Since you have not changed the implementation, the output will be the same as in 5.2 Polymorphism.
5.4 Class diagram
The class diagram of the Shape class looks like this:


+ means public
- means private (not used here)
# means protected
<<constant>> means constant field (PascalCase per C# conventions)
Underlined means static
<<abstract>> on the class and * after an operation name match UML italic for abstract class and abstract operations.
5.5 Exercise 5.3 Nullable and value types
-
Add the following code at the end of your
Mainmethod:1 2 3 4 5 6 7 8 9
int integer1 = 3; int integer2 = 3; int? integer3 = 3; int? integer4 = 3; Console.WriteLine(integer1); Console.WriteLine(integer2); Console.WriteLine(integer3); Console.WriteLine(integer4);- The first line assigns the value 3 to a variable of the primitive type.
- The second line also uses a primitive type.
- The third and fourth lines create nullable integers. The
?makes the value type nullable. - Note that
intandint?can both be printed withConsole.WriteLine; the compiler handles the conversion. int?can holdnull, which primitiveintcannot.
-
Run your program and note that the value 3 is displayed four times.
6.1 Summary
List<T>is called a (generic) list (of type T) and is more flexible than arrays, for example because you can dynamically adjust the length.- Type casting and
is/asare two tools to work with the correct class type.
6.2 List
- If needed, start from the project up to chapter 5. This contains the classes as you left them at the end of chapter 5.
-
Add the following code to your
Mainmethod:1 2 3 4 5 6 7 8 9 10 11 12
List<Circle> myCircles = new List<Circle>(); myCircles.Add(new Circle(3, new Point(1, 4), "green")); myCircles.Add(new Circle()); myCircles.Add(new Circle(6)); Console.WriteLine($"There are now {myCircles.Count} circles"); Console.WriteLine("The radius of my second circle is: " + myCircles[1].Radius); myCircles.RemoveAt(2); Console.WriteLine($"There are now {myCircles.Count} circles"); ShowInformation(myCircles[1]);List<Circle> myCircles = new List<Circle>();declares a List with objects of theCircleclass namedmyCircles.- The next three lines fill the List with three objects.
myCircles.Countgives the number of objects in the List, which is now three.myCircles[1]gives the second object (aCircle);myCircles[1].Radiusgives the radius of that object.myCircles.RemoveAt(2)removes the third object.myCircles.Countgives the number of objects in the List, which is now two.
-
Run your program. Your output will look like this:
1 2 3 4 5 6 7 8
There are now 3 circles The radius of my second circle is: 1.0 There are now 2 circles Color: white Perimeter: 6.283185307179586 Area: 3.141592653589793 Radius: 1.0 Center: (0.00, 0.00)
6.3 For-loop through a List
- Remove the line
ShowInformation(myCircles[1]);from yourMainmethod. -
Add the following code to your
Mainmethod:1 2 3 4 5
for (int i = 0; i < myCircles.Count; i++) { ShowInformation(myCircles[i]); Console.WriteLine(); }- Always start your for-loop with 0.
- The index must never equal
Count.Count = 2means indices 0 and 1 are valid!
-
Run your program. You will see the information about the two circles present.
-
Remove the code above and add the following code:
1
2
3
4
5
foreach (Circle circle in myCircles) { ShowInformation(circle); Console.WriteLine(); }circleis the variable name of typeCirclethat iterates through themyCircleslist. -
Run your program. Your output is exactly the same as above.
6.4 The Surface class
-
Create a new class
Surfaceaccording to the code below:1 2 3 4 5 6 7 8 9 10 11 12 13 14 15 16 17 18 19 20 21 22 23 24 25 26 27 28 29 30 31 32 33 34
namespace Geometry.Models { public class Surface { private double _length; private double _width; public List<Shape> MyShapes; public Surface(double length, double width) { _length = length; _width = width; MyShapes = new List<Shape>(); } public void AddShape(Shape shape) { MyShapes.Add(shape); } public override string ToString() { string result = ""; if (MyShapes.Count > 0) { foreach (Shape shape in MyShapes) { result += shape.ToString() + "\n\n"; } } return result; } } }- In this class, a
List<Shape>is created of the abstract classShape. - The
AddShape()method only knows the abstract classShape. - The
ToString()method calls theToString()method of the objects in the list.
The surface is filled according to the diagram below:
- In this class, a
-
Add the following code to your
Mainmethod:1 2 3 4 5 6 7 8
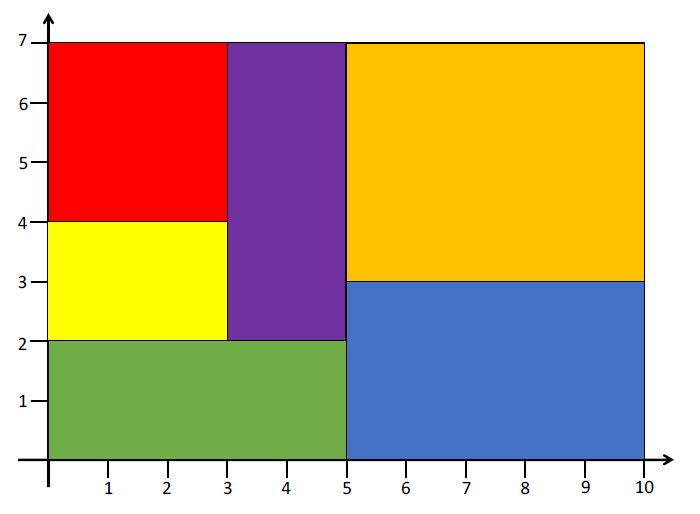
Surface surface = new Surface(10, 7); surface.AddShape(new Rectangle(3, 3, new Point(0, 7), "red")); surface.AddShape(new Rectangle(3, 2, new Point(0, 4), "yellow")); surface.AddShape(new Rectangle(5, 2, new Point(0, 2), "green")); surface.AddShape(new Rectangle(2, 5, new Point(3, 7), "purple")); surface.AddShape(new Rectangle(5, 4, new Point(5, 7), "orange")); surface.AddShape(new Rectangle(5, 3, new Point(5, 3), "blue")); Console.WriteLine(surface); -
Run your program. The output shows the information for each shape.
Below you fill the following surface:
-
Add the following code and run your program:
1 2 3 4 5 6 7 8
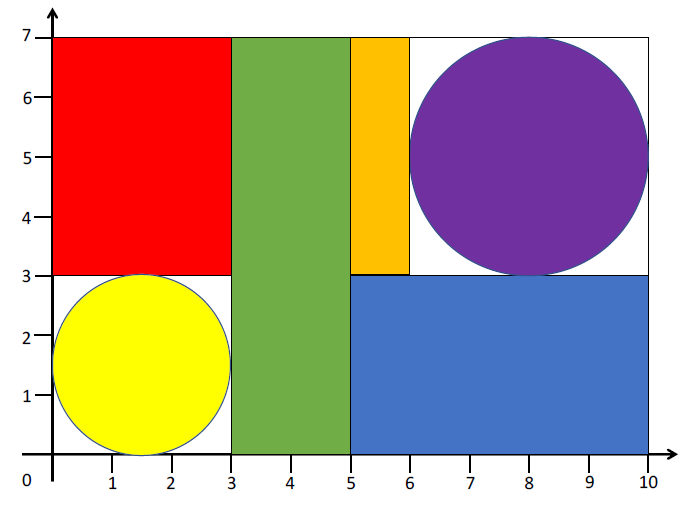
Surface surface2 = new Surface(10, 7); surface2.AddShape(new Rectangle(3, 4, new Point(0, 7), "red")); surface2.AddShape(new Circle(1.5, new Point(1.5, 1.5), "yellow")); surface2.AddShape(new Rectangle(2, 7, new Point(3, 7), "green")); surface2.AddShape(new Rectangle(1, 4, new Point(5, 7), "orange")); surface2.AddShape(new Circle(2, new Point(8, 5), "purple")); surface2.AddShape(new Rectangle(5, 3, new Point(5, 3), "blue")); Console.WriteLine(surface2);The output shows the correct information for each shape.
6.5 Type checking and casting
Before a shape can be added to a surface, you can first check whether it fits within the surface. To simplify, we only look at the size of the shape here, not its position.
A circle fits in a rectangular surface if the radius is less than or equal to half the width.
A rectangle fits in a rectangular surface if both the length and width of the rectangle are less than or equal to the length and width of the surface.
-
Add the following method to the
Surfaceclass:1 2 3 4 5 6 7 8 9 10 11 12 13 14
private bool ShapeFitsInSurface(Shape shape) { if (shape is Rectangle rect) { if (rect.Length <= _length && rect.Width <= _width) return true; } else if (shape is Circle circle) { if (circle.Radius <= _width / 2) return true; } return false; }- The condition
shape is Rectangle rectis true if the variableshapeis of the derived classRectangle. The pattern creates a variablerectof typeRectangle. - It is then possible to use
rectin the following lines without explicit casting. - If
shapeis not of typeRectangle, it is treated asCircleand we can use thecirclevariable.
- The condition
-
Add a check in the
AddShape()method:1 2 3 4 5 6 7 8 9 10 11 12
public void AddShape(Shape shape) { if (ShapeFitsInSurface(shape)) { MyShapes.Add(shape); Console.WriteLine("This shape has been added"); } else { Console.WriteLine("This shape is too large"); } } -
Modify the code in your
Mainmethod to test some shapes:1 2 3 4 5 6 7
Surface surface2 = new Surface(10, 7); surface2.AddShape(new Rectangle(4, 3, new Point(0, 7), "red")); surface2.AddShape(new Circle(4, new Point(1.5, 1.5), "yellow")); surface2.AddShape(new Rectangle(9, 8, new Point(3, 2), "green")); surface2.AddShape(new Rectangle(4, 1, new Point(5, 7), "orange")); surface2.AddShape(new Circle(2, new Point(8, 5), "purple")); surface2.AddShape(new Rectangle(11, 3, new Point(5, 3), "blue")); -
Run your program. Your output will look like this:
1 2 3 4 5 6
This shape has been added This shape is too large This shape is too large This shape has been added This shape has been added This shape is too large
6.6 Class diagram
The complete class diagram now looks like this:


- The
Surfaceclass contains 0 or more objects of theShapeclass. - An object of the
Shapeclass can be placed in 0 or moreSurfaceobjects. - A surface knows about the shapes it contains.
- A shape does not know in which surfaces it is placed.
+ means public
- means private
# means protected
<<constant>> means constant field (PascalCase per C# conventions)
Underlined means static
Italic means abstract
White triangle means derived class
Open arrow means unidirectional
7.1 Summary
- An interface is a class-like construct to specify behavior for classes.
- An interface has only abstract members (no implementation).
- The implementing classes must implement the members.
7.2 IComparable interface
- If needed, start from the project up to chapter 6. This contains the classes as you left them at the end of chapter 6.
-
Make the
Shapeclass implement theIComparable<Shape>interface:1public abstract class Shape : IComparable<Shape> -
Add a
CompareTomethod:1 2 3 4 5 6 7 8 9 10
public int CompareTo(Shape? other) { if (other == null) return 1; if (CalculateArea() > other.CalculateArea()) return 1; else if (CalculateArea() < other.CalculateArea()) return -1; else return 0; } -
Change the
ToString()method in theSurfaceclass as follows:1 2 3 4 5 6 7 8 9 10 11 12 13
public override string ToString() { string result = ""; if (MyShapes.Count > 0) { MyShapes.Sort(); foreach (Shape shape in MyShapes) { result += shape.ToString() + "\n\n"; } } return result; }Note that
MyShapes.Sort()sorts the list first. The items are then printed in ascending order by area. -
Change the code in your
Mainmethod as follows:1 2 3 4 5 6 7 8
Surface surface = new Surface(10, 7); surface.AddShape(new Rectangle(3, 3, new Point(0, 7), "red")); surface.AddShape(new Rectangle(3, 2, new Point(0, 4), "yellow")); surface.AddShape(new Rectangle(5, 2, new Point(0, 2), "green")); surface.AddShape(new Rectangle(2, 5, new Point(3, 7), "purple")); surface.AddShape(new Rectangle(5, 4, new Point(5, 7), "orange")); surface.AddShape(new Rectangle(5, 3, new Point(5, 3), "blue")); Console.WriteLine(surface); -
Run your program and note that the shapes are displayed in ascending order by area.
7.3 Class diagram


+ means public
- means private
# means protected
<<constant>> means constant field (PascalCase per C# conventions)
Underlined means static
Italic means abstract
White triangle with solid line means derived class
White triangle with dashed line means interface
Open arrow means unidirectional
8.1 Summary
- Exceptions are situations where something goes wrong.
- When this situation occurs, an exception is thrown.
- The exception must then be caught.
8.2 Exceptions (throw and catch)
- If needed, start from the project up to chapter 7. This contains the classes as you left them at the end of chapter 7.
-
Change the code of the
Radiussetter in theCircleclass as follows:1 2 3 4 5 6 7 8 9 10
public double Radius { get => _radius; set { if (value <= 0) throw new ArgumentException("The radius must be positive."); _radius = value; } }ArgumentExceptionis an exception that indicates invalid arguments. The setter checks whether a valid radius is provided and throws an exception if not. -
Modify the all-args constructor in the
Circleclass as follows:1 2 3 4 5
public Circle(double radius, Point center, string color) : base(color) { Radius = radius; // Use setter to validate _center = center; }The constructor now calls the setter, so an invalid radius cannot be set directly.
-
Add the following code to the
Mainmethod of your program:1 2 3 4 5 6 7 8 9 10 11 12 13 14 15 16
Console.Write("Enter a radius: "); string? input = Console.ReadLine(); double radius = double.Parse(input ?? "0"); try { Circle enteredCircle = new Circle(radius); Console.WriteLine(enteredCircle); } catch (ArgumentException ex) { Console.WriteLine(ex.Message); } finally { Console.WriteLine("Your input has been processed."); } -
Run your program. Example with invalid input (-7):
1 2 3
Enter a radius: -7 The radius must be positive. Your input has been processed.Example with valid input (4):
1
2
3
4
5
6
7
Enter a radius: 4 Color: white Perimeter: 25.132741228718345 Area: 50.26548245743669 Radius: 4.0 Center: (0.00, 0.00) Your input has been processed. -
Apply the same validation to the
LengthandWidthsetters in theRectangleclass, and update the all-args constructor accordingly. -
Add similar code in your
Mainmethod to test rectangle input with length and width validation.
9.1 Summary
- Reading text from a file is done with
StreamReaderorFile.ReadAllLines. - Writing text to a file is done with
StreamWriterorFile.WriteAllLines.
9.2 Reading from a file
- If needed, start from the project up to chapter 8. This contains the classes as you left them at the end of chapter 8.
- Create a new folder in your project named
Data. -
Create a file
Rectangle.csvwith the following content and place it in theDatafolder:1 2 3 4 5
3,3,0,7,red
3,2,0,4,yellow
5,2,0,2,green
5,2,3,7,purple
5,4,5,7,orange
Format: length, width, x, y, color
-
Add the following code to your
Mainmethod:1 2 3 4 5 6 7 8 9 10 11 12 13 14 15 16 17 18 19 20 21 22 23 24 25 26
List<Rectangle> rectangles = new List<Rectangle>(); string filePath = "Data/Rectangle.csv"; try { string[] lines = File.ReadAllLines(filePath); foreach (string line in lines) { string[] values = line.Split(','); double length = double.Parse(values[0]); double width = double.Parse(values[1]); double x = double.Parse(values[2]); double y = double.Parse(values[3]); rectangles.Add(new Rectangle(length, width, new Point(x, y), values[4])); } foreach (Rectangle rect in rectangles) { Console.WriteLine(rect); Console.WriteLine(); } } catch (FileNotFoundException) { Console.WriteLine("The file was not found."); }File.ReadAllLines(filePath)can throw aFileNotFoundException. Therefore use a try/catch block.- Make sure the file is copied to the output directory: in the .csproj add
<Content Include="Data\*.csv" CopyToOutputDirectory="PreserveNewest" />or set "Copy to Output Directory" to "Copy if newer" in file properties.
-
Run your program. You will see the information of five rectangles.
9.3 Writing to a file
-
Remove the following code from your
Mainmethod:1 2 3 4 5
foreach (Rectangle rect in rectangles) { Console.WriteLine(rect); Console.WriteLine(); } -
Add the following code to your
Mainmethod:1 2 3 4 5 6 7 8 9 10 11 12 13 14 15 16
string outputPath = "Data/Rectangles.txt";
try
{
    using (StreamWriter writer = new StreamWriter(outputPath))
    {
        foreach (Rectangle rect in rectangles)
        {
            writer.WriteLine(rect);
            writer.WriteLine();
        }
    }
}
catch (IOException)
{
    Console.WriteLine("The file could not be created.");
}
Note: It is essential to properly close or dispose of the
StreamWriter(theusingstatement does this automatically). Otherwise the data may not be written to the file.
10.1 Summary
- ADO.NET is used to communicate with database management systems (equivalent to JDBC in Java).
- DAO stands for Data Access Object and is used to handle SQL statements correctly.
- Specific tasks are placed in their own classes:
- DbAccess is used for setting up and maintaining the connection between C# and the DBMS.
- Entity DAOs (e.g., PointDao, CircleDao) are entity-specific DAOs used to execute SQL statements relevant to that entity.
- AbstractDao is used for attributes and methods shared by the individual entity DAOs.
- These classes go in a
DataorDatabasefolder.
10.2 Setting up database and writing points
- If needed, start from the project up to chapter 9. This contains the classes as you left them at the end of chapter 9.
- The SQL script
CreateInsertScriptShapes.sqlis available in theDatafolder. Run it in MySQL Workbench. You will have a databaseShapeswith tablesCircle,Shape,Point, andRectangle, plus a user and password. - Add the MySql.Data NuGet package to your project:
dotnet add package MySql.Data -
Add the following constant to your
Programclass (above the Main method):1 2
private const string ConnectionString =
"Server=localhost;Database=Shapes;User=userShapes;Password=userShapesPW;";
This connection string tells MySQL how to connect:
-Server=localhost: connect to a MySQL server running on your own machine.
-Database=Shapes: use theShapesdatabase that you created with the SQL script.
-User=userShapes: log in with the application useruserShapes.
-Password=userShapesPW: use the password that was created for this user.
Together these parts must match the server, database, user, and password you actually have in MySQL Workbench; if any part is different, the connection will fail. -
Add the following code to your
Mainmethod:1 2 3 4 5 6 7 8 9 10 11 12 13 14 15 16 17 18 19 20 21 22 23 24 25 26 27 28
using MySql.Data.MySqlClient; MySqlConnection? connection = null; try { connection = new MySqlConnection(ConnectionString); connection.Open(); } catch (MySqlException ex) { Console.WriteLine("SQL Exception: " + ex.Message); } if (connection != null) { Console.WriteLine("Connection established!"); string sql = "INSERT INTO Point VALUES (3, 5);"; try { MySqlCommand command = new MySqlCommand(sql, connection); command.ExecuteNonQuery(); connection.Close(); } catch (MySqlException ex) { Console.WriteLine(ex); } }- The query is in the string
sql. In this case, a point with coordinates (3, 5) is added to thePointtable. - The command is executed via the connection.
- After execution, the connection can be closed.
- The query is in the string
-
Run your program and verify in Workbench that the point was created.
10.3 Reading points
-
Change the code inside the
if (connection != null)block as follows:1 2 3 4 5 6 7 8 9 10 11 12 13 14 15 16 17 18 19 20 21
if (connection != null)
{
    Console.WriteLine("Connection established!");
    string sql = "SELECT * FROM Point;";
    try
    {
        MySqlCommand command = new MySqlCommand(sql, connection);
        using MySqlDataReader reader = command.ExecuteReader();
        while (reader.Read())
        {
            double x = reader.GetDouble("xcoordinate");
            double y = reader.GetDouble("ycoordinate");
            Console.WriteLine($"({x:F2}, {y:F2})");
        }
        connection.Close();
    }
    catch (MySqlException ex)
    {
        Console.WriteLine(ex);
    }
}
This is the standard way to read data from a database.
- The query is in the string
sql. In this case, all rows from thePointtable are retrieved. - The results are returned in a
MySqlDataReader. - The while-loop iterates through the rows. Columns are accessed by column name (as defined in Workbench).
- After execution, the connection can be closed.
- The query is in the string
-
Try some other queries, such as
"SELECT * FROM Circle WHERE radius > 5"and display the radius of the returned circles. Adjust the code in the while-loop accordingly.
10.4 DbAccess class
- Create a new folder
Data(orDatabase) in your project. -
Create a class
DbAccess:1 2 3 4 5 6 7 8 9 10 11 12 13 14 15 16 17 18 19 20 21 22 23 24 25 26 27 28 29 30 31
namespace Geometry.Data
{
    public class DbAccess
    {
        private readonly string _connectionString;
        private MySqlConnection? _connection;

        public DbAccess(string connectionString)
        {
            _connectionString = connectionString;
        }

        public void OpenConnection()
        {
            _connection = new MySqlConnection(_connectionString);
            _connection.Open();
        }

        public MySqlConnection GetConnection()
        {
            if (_connection == null)
                throw new InvalidOperationException("Connection not opened.");
            return _connection;
        }

        public void CloseConnection()
        {
            _connection?.Close();
        }
    }
}
All code related to creating a connection to a database is placed in a separate class. We can then create objects that handle the connection. The code in
Mainis greatly simplified. The code in theDbAccessclass becomes reusable. The class diagram of theDbAccessclass is as follows:

- The attribute
_connectionholds the active connection to the DBMS. - The constructor needs the connection string, for example:
Server=localhost;Database=Shapes;User=userShapes;Password=userShapesPW; - In that connection string:
Serveris the MySQL host,Databaseis the schema to use,
Useris the login name, andPasswordis the login password. - The three methods
OpenConnection(),GetConnection(), andCloseConnection()are now placed in theDbAccessclass.
- The attribute
-
Remove the constant you added above the
Mainmethod. -
Change the code in your
Mainmethod to useDbAccess:1 2 3 4 5 6 7 8 9 10 11 12 13 14 15 16 17 18 19 20 21
DbAccess dbAccess = new DbAccess("Server=localhost;Database=Shapes;User=userShapes;Password=userShapesPW;"); dbAccess.OpenConnection(); var connection = dbAccess.GetConnection(); string sql = "SELECT * FROM Point;"; try { MySqlCommand command = new MySqlCommand(sql, connection); using MySqlDataReader reader = command.ExecuteReader(); while (reader.Read()) { double x = reader.GetDouble("xcoordinate"); double y = reader.GetDouble("ycoordinate"); Console.WriteLine($"({x:F2}, {y:F2})"); } } catch (MySqlException ex) { Console.WriteLine(ex); } dbAccess.CloseConnection();- You create a new instance of the
DbAccessclass with the correct parameters to access the database. - The
dbAccessobject is then used to open, provide, and close the connection.
- You create a new instance of the
-
Run your program. The output is the same as in 10.3. step 1.
10.5 PointDao class
-
Create a class
PointDaoin the Data folder:1 2 3 4 5 6 7 8 9 10 11 12 13 14 15 16 17 18 19 20 21 22 23 24 25 26 27 28 29 30 31 32 33 34
namespace Geometry.Data { public class PointDao { private readonly DbAccess _dbAccess; public PointDao(DbAccess dbAccess) { _dbAccess = dbAccess; } public void SavePoint(Point point) { string sql = "INSERT INTO Point VALUES (@x, @y)"; var cmd = new MySqlCommand(sql, _dbAccess.GetConnection()); cmd.Parameters.AddWithValue("@x", point.X); cmd.Parameters.AddWithValue("@y", point.Y); cmd.ExecuteNonQuery(); } public List<Point> GetPoints() { List<Point> points = new List<Point>(); string sql = "SELECT * FROM Point;"; var cmd = new MySqlCommand(sql, _dbAccess.GetConnection()); using var reader = cmd.ExecuteReader(); while (reader.Read()) { points.Add(new Point(reader.GetDouble("xcoordinate"), reader.GetDouble("ycoordinate"))); } return points; } } }- The method can save any point.
- In the SQL query, parameters are used (
@x,@y) instead of question marks. This prevents SQL injection. - The
PointDaohas an attribute of typeDbAccessso it can get the connection.
-
Change the code in your
Mainmethod:1 2 3 4 5 6 7 8 9 10 11 12
DbAccess dbAccess = new DbAccess("Server=localhost;Database=Shapes;User=userShapes;Password=userShapesPW;");
dbAccess.OpenConnection();

PointDao pointDao = new PointDao(dbAccess);
pointDao.SavePoint(new Point(-4, -2));

foreach (Point point in pointDao.GetPoints())
{
    Console.WriteLine(point);
}

dbAccess.CloseConnection();
In
Main, aDbAccessobject is created and a connection is opened.- Next, a
PointDaoobject is created, and theDbAccessobject is passed to its constructor. - The
PointDaoobject can now store a point via theSavePoint()method. - The
PointDaoobject also has theGetPoints()method, which returns all stored points from the table as aList<Point>.
- Next, a
-
Run your program. You have added an extra point to the database.
10.6 CircleDao class
-
Create a class
CircleDaoin the Data folder:1 2 3 4 5 6 7 8 9 10 11 12 13 14 15 16 17
namespace Geometry.Data { public class CircleDao { private readonly DbAccess _dbAccess; public CircleDao(DbAccess dbAccess) { _dbAccess = dbAccess; } public void SaveCircle(Circle circle) { // Implementation in 10.7 Auto-increment values } } } -
The class has an attribute of type
DbAccessand a constructor. There is an empty methodSaveCircle(Circle circle).
10.7 Auto-increment values
-
Add the following code to the
SaveCirclemethod inCircleDao:1 2 3 4 5 6 7 8 9 10 11 12 13 14 15 16 17 18 19 20 21 22 23 24 25 26 27 28 29 30 31 32 33 34
public void SaveCircle(Circle circle)
{
    string sql = "INSERT INTO Shape(color) VALUES (@color);";
    int primaryKey = 0;
    try
    {
        var cmd = new MySqlCommand(sql, _dbAccess.GetConnection());
        cmd.Parameters.AddWithValue("@color", circle.Color);
        cmd.ExecuteNonQuery();

        cmd.CommandText = "SELECT LAST_INSERT_ID();";
        primaryKey = Convert.ToInt32(cmd.ExecuteScalar());
        Console.WriteLine($"The added key is {primaryKey}");
    }
    catch (MySqlException ex)
    {
        Console.WriteLine(ex);
        return;
    }

    sql = "INSERT INTO Circle VALUES (@id, @radius, @x, @y);";
    try
    {
        var cmd = new MySqlCommand(sql, _dbAccess.GetConnection());
        cmd.Parameters.AddWithValue("@id", primaryKey);
        cmd.Parameters.AddWithValue("@radius", circle.Radius);
        cmd.Parameters.AddWithValue("@x", circle.Center.X);
        cmd.Parameters.AddWithValue("@y", circle.Center.Y);
        cmd.ExecuteNonQuery();
    }
    catch (MySqlException ex)
    {
        Console.WriteLine(ex);
    }
The color of a circle is stored in the
Shapetable. A primary key is generated (auto-increment). This code inserts a shape and retrieves the generated primary key.- First, a row is inserted into
Shape.LAST_INSERT_ID()returns the auto-increment value. - Then a row is inserted into
Circlewith that primary key and the circle data.
- First, a row is inserted into
-
Change the code in your
Mainmethod:1 2 3 4 5 6 7
DbAccess dbAccess = new DbAccess("Server=localhost;Database=Shapes;User=userShapes;Password=userShapesPW;"); dbAccess.OpenConnection(); CircleDao circleDao = new CircleDao(dbAccess); circleDao.SaveCircle(new Circle(5, new Point(3, 7), "orange")); dbAccess.CloseConnection(); -
Run your program and verify in Workbench that a shape with color orange and a circle with the corresponding shapenumber were added.
11.1 Summary
- Specific tasks are placed in their own classes:
- DbAccess is used for setting up and maintaining the connection between C# and the DBMS.
- Entity DAOs are entity-specific DAOs used to execute SQL statements for that entity.
- AbstractDao is used for attributes and methods shared by the entity DAOs.
- These classes go in the Data/Database folder.
11.2 AbstractDao class
-
Create a class
AbstractDaoin the Data folder:1 2 3 4 5 6 7 8 9 10 11 12
namespace Geometry.Data
{
    public abstract class AbstractDao
    {
        protected readonly DbAccess _dbAccess;

        protected AbstractDao(DbAccess dbAccess)
        {
            _dbAccess = dbAccess;
        }
    }
}

All DAO classes use a
DbAccessattribute. Common code can be placed in a base classAbstractDao.
11.3 Adapt PointDao
-
Make
PointDaoinherit fromAbstractDao, remove the_dbAccessattribute, and adjust the constructor:1 2 3 4 5 6 7
public class PointDao : AbstractDao { public PointDao(DbAccess dbAccess) : base(dbAccess) { } // ... rest of the class uses _dbAccess from base } -
The
_dbAccessattribute is now inherited fromAbstractDao.
11.4 Refactor CircleDao
-
Change the first lines of the
CircleDaoclass definition:1 2 3 4 5
public class CircleDao : AbstractDao { public CircleDao(DbAccess dbAccess) : base(dbAccess) { } -
Add a helper method below
SaveCircle:1 2 3 4 5 6 7 8 9 10 11 12 13 14 15 16 17 18
private int SaveShape(string color) { string sql = "INSERT INTO Shape(color) VALUES (@color);"; int primaryKey = 0; try { var cmd = new MySqlCommand(sql, _dbAccess.GetConnection()); cmd.Parameters.AddWithValue("@color", color); cmd.ExecuteNonQuery(); cmd.CommandText = "SELECT LAST_INSERT_ID();"; primaryKey = Convert.ToInt32(cmd.ExecuteScalar()); } catch (MySqlException ex) { Console.WriteLine(ex); } return primaryKey; } -
Simplify the
SaveCirclemethod:1 2 3 4 5 6 7 8 9 10 11 12 13 14 15 16 17 18
public void SaveCircle(Circle circle) { int primaryKey = SaveShape(circle.Color); string sql = "INSERT INTO Circle VALUES (@id, @radius, @x, @y);"; try { var cmd = new MySqlCommand(sql, _dbAccess.GetConnection()); cmd.Parameters.AddWithValue("@id", primaryKey); cmd.Parameters.AddWithValue("@radius", circle.Radius); cmd.Parameters.AddWithValue("@x", circle.Center.X); cmd.Parameters.AddWithValue("@y", circle.Center.Y); cmd.ExecuteNonQuery(); } catch (MySqlException ex) { Console.WriteLine(ex); } } -
Add the following UML class diagram:


The
PointDaoandCircleDaoclasses are subclasses ofAbstractDao. Therefore, these classes have access to the attributes ofAbstractDao.- They also have access to the shared methods used to handle SQL statements.
- The
PointDaoclass only contains methods that are specific to objects of thePointclass. - The
CircleDaoclass only contains methods that are specific to objects of theCircleclass.
-
Change the code in your
Mainmethod:1 2 3 4 5 6 7 8 9 10 11 12
DbAccess dbAccess = new DbAccess("Server=localhost;Database=Shapes;User=userShapes;Password=userShapesPW;"); dbAccess.OpenConnection(); PointDao pointDao = new PointDao(dbAccess); pointDao.SavePoint(new Point(8, -12)); foreach (Point point in pointDao.GetPoints()) Console.WriteLine(point); CircleDao circleDao = new CircleDao(dbAccess); circleDao.SaveCircle(new Circle(6.5, new Point(-2.3, -1.3), "purple")); dbAccess.CloseConnection(); -
Run your program and verify in Workbench that the point and circle were added.